Table of Contents
ToggleWhether you’re building a home studio, creating a peaceful office environment, or just trying to get some sleep without street noise interrupting your dreams, knowing how to soundproof a room can make all the difference. Fortunately, soundproofing doesn’t have to be overly expensive or complicated. With the right approach, tools, and materials, you can significantly reduce noise transfer in any room.
In this guide, we’ll walk you through the process of soundproofing a room from start to finish—exploring both DIY solutions and professional options that cater to different budgets and needs.
Understanding Sound: The Basics of Noise Control
Before diving into the details of how to soundproof a room, it’s important to understand the two main types of noise you’ll be dealing with:
-
Airborne Noise: This includes sounds like talking, music, television, and barking dogs. These noises travel through the air and enter your room through gaps and thin walls.
-
Impact Noise: This is caused by vibrations through structures—think footsteps on a ceiling, furniture moving, or slamming doors.
Effective soundproofing targets both types using four main principles:
-
Mass – Adding dense materials to block sound.
-
Damping – Reducing vibrations that carry noise.
-
Decoupling – Separating structures to prevent sound transfer.
-
Absorption – Using soft materials to soak up sound waves.
Step 1: Identify the Noise Source
The first step in learning how to soundproof a room is identifying where the noise is coming from. Stand in the room and listen—can you hear sound coming from outside, above, or adjacent rooms? Common noise entry points include:
-
Doors and windows
-
Walls (especially shared walls)
-
Floors and ceilings
-
HVAC vents and electrical outlets
Mapping this out helps you prioritize which areas to treat first, especially if you’re on a budget.
Step 2: Soundproofing Doors and Windows
Doors
Standard interior doors are typically hollow and let a lot of noise through. Here’s how to upgrade them:
-
Replace with solid core doors – These are much heavier and block sound more effectively.
-
Use door sweeps and seals – Install a door sweep at the bottom and adhesive weatherstripping around the frame to block air gaps.
-
Add a soundproof blanket – For temporary or budget solutions, hang a soundproof blanket or curtain over the door.
Windows
Windows are another weak point. Here’s how to treat them:
-
Seal gaps with acoustic caulk – Fill any cracks between the frame and wall.
-
Install soundproof curtains – Thick, heavy drapes can absorb some airborne noise.
-
Use window inserts – These act like an additional pane of glass, creating an air gap that reduces noise transmission.
-
Upgrade to double or triple-pane glass – Best for long-term results but more expensive.
Step 3: Soundproofing Walls
When people ask how to soundproof a room, they often think of the walls first—and for good reason. Here are a few effective ways to do it:
Add Mass
-
Mass Loaded Vinyl (MLV): This dense, flexible material can be added under drywall or over existing walls to block noise.
-
Additional Drywall Layers: Adding another layer (or two) of drywall increases the wall’s mass and sound-blocking ability. Use soundproofing drywall or combine standard drywall with Green Glue.
Use Damping Compounds
-
Green Glue Noiseproofing Compound: Apply between drywall layers to reduce sound vibrations. It’s a favorite among contractors and DIYers.
Decouple the Wall
-
Resilient Channels or Sound Clips: These create a gap between the drywall and the studs, reducing the transfer of vibrations.
Acoustic Panels (for absorption)
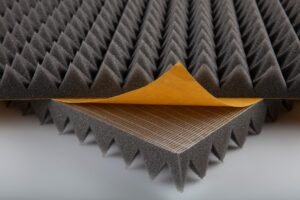
While acoustic panels won’t block noise, they do reduce echo and improve sound quality within the room. They’re especially useful in home studios and offices.

Step 4: Soundproofing Floors and Ceilings
Noise can come through the ceiling above or the floor below. To address both:
Floors
-
Add rugs and carpet pads: A quick and affordable way to absorb impact noise.
-
Use floor underlayments: Materials like cork, rubber, or foam go under laminate or hardwood flooring and reduce impact sound.
-
Install floating floors: More complex but highly effective, this technique involves decoupling the floor from the subfloor.
Ceilings
-
Add a drop ceiling with acoustic tiles: Helps trap sound between the existing and new ceiling.
-
Install isolation clips and resilient channels: Similar to wall decoupling methods, they prevent vibration transfer from the floor above.
-
Use dense insulation (like rock wool): Stuffed between ceiling joists to absorb airborne noise.
Step 5: Addressing Vents, Outlets, and Other Weak Points
These small details are often overlooked when learning how to soundproof a room, but they can make a significant difference.
-
Seal HVAC vents: Use acoustic foam or specialized soundproof vent covers.
-
Insulate electrical outlets: Use foam gaskets behind the outlet covers, or install acoustic putty pads.
-
Block gaps and cracks: Use acoustic sealant (not regular caulk) around baseboards, crown molding, and trim.
Step 6: Soundproofing on a Budget
If you’re wondering how to soundproof a room without spending a fortune, here are some budget-friendly tips:
-
Use bookshelves: Filled with books, they add mass and absorb sound.
-
Hang thick curtains or blankets: Cover windows or walls with heavy fabrics to muffle noise.
-
Weatherstrip doors and windows: A simple and cheap solution to block drafts and sound.
These low-cost methods won’t create a studio-grade soundproof room, but they can make a noticeable improvement in daily noise levels.

When to Call a Professional
While many soundproofing solutions can be done DIY, some situations may require expert help:
-
You’re building a recording studio or music room.
-
You live in a condo or apartment with strict construction rules.
-
You want the most effective results with the least trial and error.
Professional contractors can assess your space, recommend the right materials, and install them efficiently.
Final Thoughts: Making Your Space Peaceful
Knowing how to soundproof a room is a valuable skill whether you’re recording music, working from home, or just seeking a quieter living space. From simple DIY hacks to more advanced construction methods, there’s a soundproofing solution for nearly every scenario and budget.
Start by identifying your biggest noise issues, then work methodically through each weak point in the room. Even small changes—like sealing doors or adding rugs—can lead to noticeable improvements. And if you’re ready to invest more deeply, techniques like adding mass, decoupling walls, and using damping compounds can dramatically reduce sound transfer.
With the right strategy, materials, and a little effort, you’ll transform any noisy room into a calm, quiet retreat.


